Ferrari 308/328 gear selector alignment
This adjustment process is one we used to do regularly on our race cars. The problem is poor shifting, and possbly jumping put of gear
particularly when getting off the throttle suddenly and it can be caused by unsympathetic use of the gearlever! For instance if you
have left the car parked and in gear then someone jumps in and pulls the gearlever to get it into neutral without dipping the clutch
this can cause one of the selectors to slide fractionally on the selector shaft, then you are stuffed! Also if the driver is at all
heavy handed with gear selection whilst driving and/or the synchros are a bit slow (like they can be when cold) and any excessive
force is used to try and get a gear, same thing... the selectors will slide, game over.
So here is the full process for re-setting the selectors. Start at the beginning and make sure that the gear shifter bearings are in good order, and the
rubber bushes at each end of the long rod are good. Better still replace them with nylon or PU bushes. Then make sure the engine mounts
are not broken and have not gone soft. Use a pry bar on them and see if they move around when levered. On a race car use solid engine
mounts, if your chassis shakes then your engine is not properly balanced...
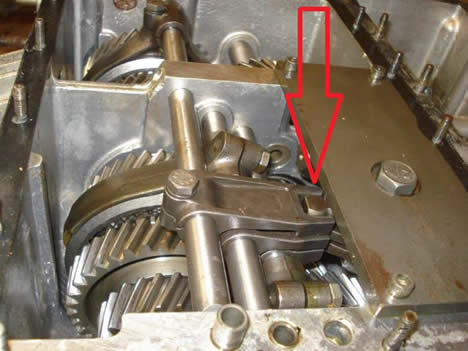
Assuming all that is good next thing is to remove the bottom plate from the gearbox (it’s the big one...) drain the oil first and inspect for debris,
inspect the magnetic plug as well. Carefully catch the springs, balls and spacers that will fall out, if they don’t fall out use
a magnet on a stick to get them out and make sure you have the right number, (three balls, three springs, one spacer). The most
important thing is to make a jig so that these springs and balls can go back in and operate correctly with the plate removed.
Without this it is all a waste of time as the selector shafts will not be in the correct positions in neutral. I have used
various bits to do this one was cut from a old casing, a bit radical? Another was made of ali plates and drilled holes knocked
up at the race track, but now we make a purpose made jig for the job which bolts up onto the adjacent studs. (You can get this from DTMPower!!)
The reason you need the balls and springs in place is that these hold the selector rods in the right place when the balls are pressed into dips in the rods.
(All the pictures are with the gearbox upside down, but this process can only be done with the gearbox in the car)
Get a competent helper to sit in the car and operate the gear lever to your instructions. Have the car on stands and leave the wheels on
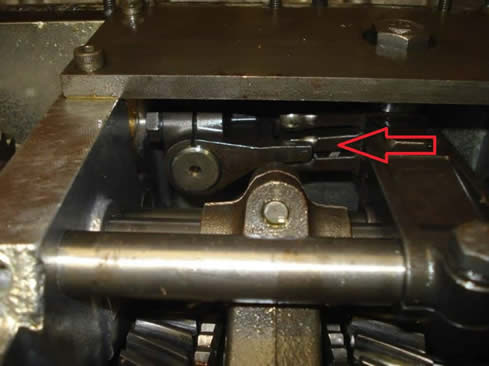
so you can turn a wheel to help the gearbox shift. Once inside the ‘box the first thing is to centralise the primary finger in
rotation so that it will travel across the input balls on the 3 bell cranks with them all stacked up in line one above the
other when the gear lever is moved across the full range of the neutral gate from 1/R to 4/5 neutral positions.
Next is to make sure the 3 secondary fingers are all lined up one above the other with the bell cranks one above the other.
It is just about impossible to adjust the 4/5 finger on its selector rod, so use that as the datum and move the other 2
if necessary by easing off the clamp bolt and sliding the finger, re-tightening the clamp bolt.
It should now be possible for the gear lever man to move across the full width of the neutral gate without any of the bell cranks
moving or being nudged by the primary finger.
Now starting with reverse get the man in the cab to select reverse and report on whether the gear lever hits the end of the slot in
the gate plate. Looking at the dog hub or synchro hub see if it has gone as far into mesh as possible with the reverse dog ring.
If the gear lever as hit the end of the slot in the gate plate chances are that the dogs are not fully engaged. Try the same thing with 1st.
The aim is to achieve maximum engagement with both reverse and 1st without the gear lever hitting either end of the slot in the shift gate plate.
Loosen the clamp bolt on the selector fork for 1/R and move it a little at a time until that movement is even between the two dog hubs.
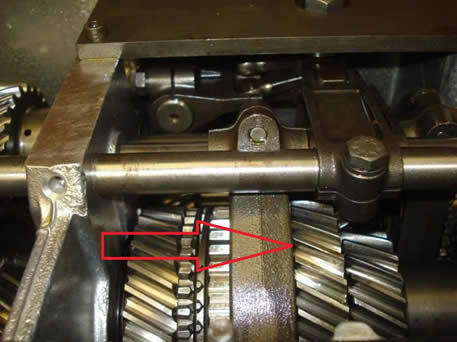
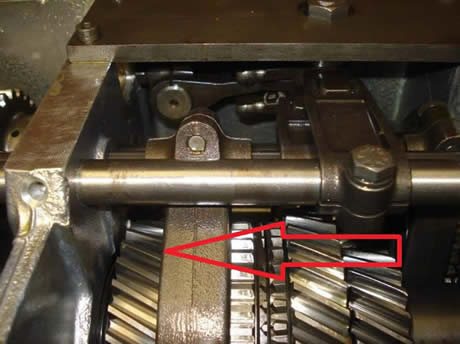
These two pictures show full engagement of the 2/3 hubs, and the selector shaft in front of them is the 1/R shaft and its clamp bolt.
All three hubs are much the same and require the same process, although the 4/5 hub is on a different shaft deeper in the 'box.
Repeat this process for the other two selector shafts. In the end the gear lever should not be able to hit the end of any of the slots.
Ferrari manufacturing tolerances being what they are it is sometimes not possible to avoid hitting one end of a slot, in this case
(and for race cars where missing a gear is a big deal!) we would file the slot a bit longer so that full dog engagement is possible.
In reality you should have 1-2mm clearance at the end of every slot the gear lever goes down.
You may have noticed some features of the ‘box in the pictures. It is a 328 ‘box which has bigger diameter selector rods, and wider
webs on all the selector forks than the 308 ‘box. We also made up a steel mounting plate for the 3 bell cranks as the standard ali
one is to flexible. The rods and forks in the 308 ‘box are quite flexible and prone to sliding about, so until we switched our
race cars to 328 ‘boxes the above procedure was required quite often!!
Some alteration in driving style also helps a lot, so do not put your great big fist right around the gear knob like they do in
the movies... use two fingers or an open palm to do the shifting with a pause in the neutral gate in every shift.
You won’t get a bit part in a Fast and Furious movie but your gearbox will last much longer! Never, Ever, pull it out of gear
when stationary without dipping the clutch.